
The best FREE patterns so WONDERFUL people like YOU can create and SHARE!
Please let us know about any broken links that you find. THANKS
|


In This Section
AllCrafts
Crafts
Sections
|
I ordered all the mail-order invitation catalogs listed in Bridal Bargains. We were immediately drawn to the ones with a sheer overlay on a colorful floral picture. We decided on a spring flowers theme. Since I like using Microsoft Publisher, I decided to try my hand at the design. It may sound complicated, but it was not very hard, trust me! Here's the details: |
 |
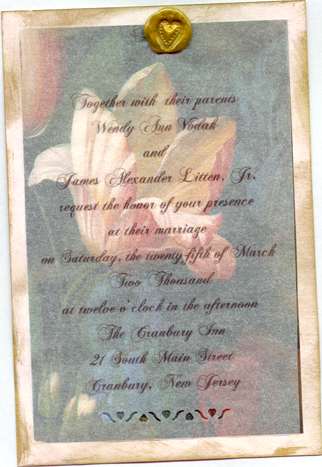
| The design begins with a painting of a tulip printed on pink ice cardstock, edged in antique gold. A sheer overlay printed with the words is attached at the top with a blob of antique gold sealing wax, imprinted with a heart. I used a punch of a heart border on the bottom edge of the sheer overlay. |
 |
| The response card is made of the same pink cardstock, stamped with a heart made of tulips in antique gold, and edged in antique gold. The words are printed directly on the cardstock. |
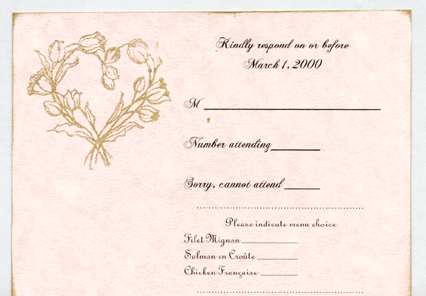 |
The envelopes for both the response card and the whole invitation are edged in gold and the flap is punched with the heart border punch. The inside flap of the envelope for the response card is stamped in antique gold with the same tulip heart as the response card. The inside flap of the larger envelope is stamped all over with small hearts in antique gold, to suggest a lined envelope.
Instead of an inner envelope, I cut sheets of white tissue paper to fit around the whole package (invite, response card, small envelope and directions) and fastened it closed with some gorgeous flower stickers from the craft store. The stickers match the style of flower on the painting that is printed on the cardstock.
I found several images with tulips on them and let my fiance choose the one he liked best. Look around at these clip art sources. If you have a theme, that's a great way to start.
We're lucky enough to have a great paper shop nearby so I went there. I selected several samples that came in card stock and medium and small envelopes. BUY THE ENVELOPES FIRST! I designed the invite and response card to fit the envelopes. It would be very hard to find envelopes to fit an arbitrary size invite that I might design.
I took home several
samples, and began printing the image on them. Right away, the pink ice
parchment was the clear winner. Very pretty and my
bridesmaids' dresses are rose.
The image does not cover the entire invite. I left a .25" border around the image. This will be edged with gold.
Every type of vellum and tracing paper is different. Every inkjet and laser printer works differently. Experiment a lot! I though this would be easy and it turned out to be very tricky. I bought vellum from the craft store and two different brands of tracing paper at other stores.
The vellum smeared very much in my inkjet and looked very stiff. I did not use it, though I experimented with it. If vellum does not smear in your inkjet, you can try embossing it. This may be difficult, but I have heard of people doing this technique.
Supplies
needed for embossing with your Inkjet Printer
Inkjet Printer (Probably will not work with laser printer.)
Clear Embossing Powder -Try a color if you're adventurous. Available at your craft store in the rubber stamping section.
Heat Gun or Toaster
Be very careful with any appliance. Use them at your own risk. A heat gun is designed for embossing and should be available wherever you buy the embossing powder. I have used an inexpensive toaster with some success.
How to do it As each sheet comes out
of your inkjet printer, pour the embossing powder on it. Shake off the
excess into a container and reuse. If you are using a heat gun, follow
the directions on the box. If you use any other appliance, like a toaster,
be very careful. Hold the paper a few inches from your heat source.
The powder will melt and become shiny. Once it has cooled, you can feel
the raised areas. This technique is commonly used for rubber stamping.
You can use it anywhere on your invite. Be creative!
The tracing paper will overlay the printed tulip design. I bought two different brands of tracing paper in two different stores, because I was worried about running out. This turned out to be a good thing.
The first brand smeared about 60% of the time. Less than half were coming out good and I was going crazy. I persevered, figuring I would eventually get enough good ones. I went through the first pad, resigned to my fate of printing endlessly.
The second pad of tracing paper did not smudge! It looked a little less sheer than the first paper and was clearly made differently. So, though this may sound strange, try to buy tracing paper brands that are different. They may be more or less sheer, or different shades of white. Another tracing paper may make all the difference.
However, some people cannot get tracing paper or vellum to work in their inkjet or laser printer at all. If that happens, try a copy store or change your design.
One caveat - tracing paper seems to only come in 9" x 12" size. My printer only accepts paper up to 8.5" x 11". I had to cut each sheet of tracing paper. I invested in a good paper cutter and used it on everything except the envelopes. ( I had to keep my sanity somewhere)
This idea came from my local rubber stamp store. (Yes, we have one of those) Originally, I was going to use a metallic pen and a straight edge along the borders of the cardstock. Well, this new idea is easier and requires far less precision.
On the advice of the rubber stamp store, I bought an inkpad used for scrapbooking (dries quicker) in antique gold. I held the pad in one hand and the card in the other. At an angle, I swiped the edges of the cardstock across the pad. Practice some - I found that I liked the irregular, messy edge I could get.
At first I was fairly restrained and neat with this technique. That gives a clean, subtle edge. Being more free with it, I swiped into the corners and across parts of the image, too. This imparts an artsy look, I think. This suited the sealing wax and painting look I had.
Essentially fancy hole punches, they come in many designs. Some are one motif, some are for corners. Mine is a small border with hearts and squigglies. I used it on the bottom edge of the sheer overlay and on the flaps of both envelopes.
For such an easy technique, it added alot of impact. They are available at craft stores, usually in the paper or rubber stamp sections. Even though it was made of metal and plastic, mine only worked easily on one sheet of paper at a time, and was very hard to use on cardstock.
Where I got this idea, I don't know... I needed something to cover the middle top edge where the sheer overlay meets the cardstock. Some invites use a small charm, a flower or maybe a small motif cut out of cardstock to cover this part. Other invites use ribbon through holes to tie it all together. Possibilities are endless!
I chose sealing wax. I heard it wasn't too hard to use. Hard to find, maybe.
First I found pre-made blobs of sealing wax at a craft store (really) Somehow, you heat the blob a little and stick it onto the card. I think you could also glue. Then you take a small rubber stamp and moisten it and press it into the heated top of the blob to get a nice impression. Well, I didn't end up trying any of this, because I returned them. They were too big. Besides, I'd found some alternatives. But they may work for you. I believe they come in many colors, too.
Next, I investigated real sealing wax, which I found in two different art stores. I didn't find any metal stamps I liked. Also, I was a little intimidated by the burning wax idea. Finally, it cost more than my final option.
Colored hot glue. The trusty rubber stamp store carries hot glue in all colors of the rainbow, including antique gold. I bought a very small rubber stamp heart and a clear embossing ink pad. Here's how it works:
Supplies needed for colored hot glue sealing wax
Glue gun (low or high temp worked, check your glue first)
Clear embossing ink pad (a color might be cool)
Rubber stamp of your choice
surface to glue on to
white glue
Experiment with
the surface to glue on. We had different results with aluminum foil, waxed
paper and the metal lid to a storage box. In any case, wait until it is
completely cool, even cold, before removal.
Lay
a small blob of glue down. Let it set-up for 3-5 seconds. Moisten the
stamp in the ink and stamp into the blob, flattening it. Voila! Looks
just like sealing wax! Be sure to ink the stamp before each impression
or else it will stick and ruin your blob!
I did not have good results with hot gluing directly onto the invitation; you may do better. So I used white glue to put the seals onto the invitation..
Here's
a list of what I'm making for my wedding:
- Invitations
- Favors
- Centerpieces
- Dress for honeymoon
- Gifts for attendants
- Flower girl basket and headpiece
- Ringbearer pillow
- Decorations for reception
- Quilt blocks for guest book
- Headpiece
I'll add directions and pictures for each as we make them! Enjoy!
More wedding crafts direct from my wedding will arrive as soon as I make them! Stay tuned or sign up for our mailing list in the lefthand column. We won't use your email address for anything else!
Return to the main Wedding Crafts page or AllCrafts main page
|
Search AllCrafts.net |

Freebies
Download Free Fonts!
Subscribe to our newsletter
Thanksgiving Crafts | Christmas Crafts | Valentine's Day | Mother's Day Crafts | Father's Day Crafts | Earth Day Crafts | Easter Crafts | April Fool's Day | Back To School Crafts | Halloween Crafts | Holiday Crafts
Angel Crafts | Baby Crafts | Basketry | Beading | Candle & Soap Making | Computer Crafts | Crochet | Knitting | Doll-Making | Drawing & Painting | Family Tree | Felt Food | Felt Flower | Floral | Gardening Crafts | Greeting Cards | Jewelry & Beading | Kids Crafts | Preschool Printables | Locker Hooking | Nail Art | Nature Crafts | Needlework | Owl Crafts | Painting | Paint Chips | Patriotic Crafts | Pennants & Buntings | Plastic Canvas | Quilting | Rubber Stamps | Scrapbooking | Sewing | Shoe Crafts | Silhouette | Soap Making | Tatting | Wedding Crafts | Woodworking
Home | Sitemap | Email | Newsletter | Advertise
...