
The best FREE patterns so WONDERFUL people like YOU can create and SHARE!
Please let us know about any broken links that you find. THANKS
|


In This Section
AllCrafts
Crafts
Sections
Back to Knitting and Crochet Projects at AllCrafts.net
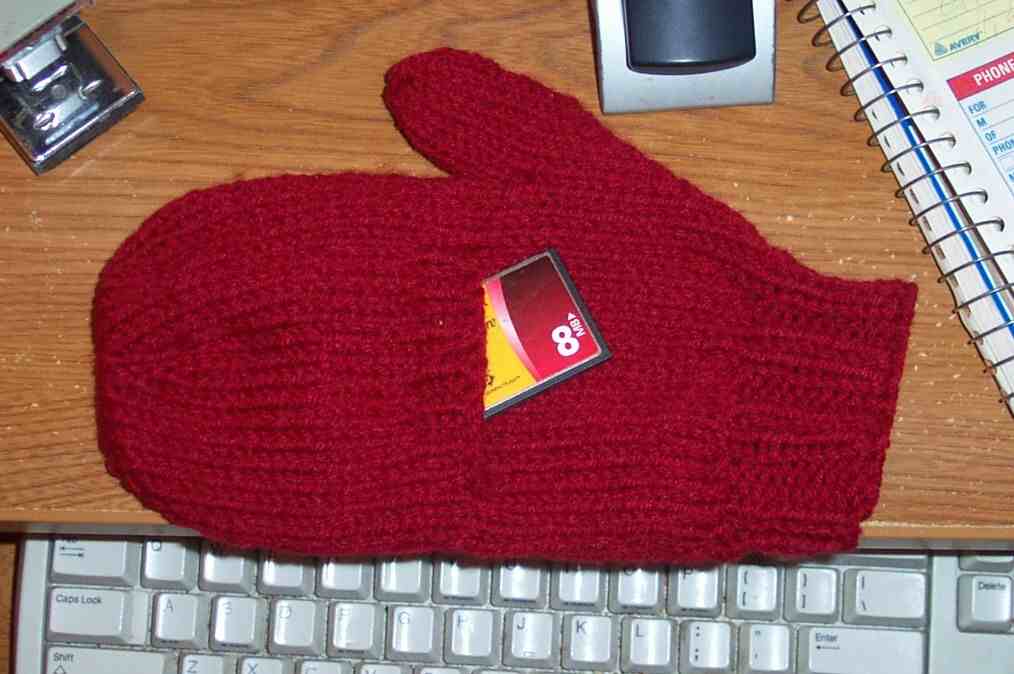
Knit Pocket Mittens |
Two needle Version/Top Down to allow for a tailored pocket . |
Add a buttonhole to the pocket ribbing so the pocket can be buttoned shut. Use the tailored pocket technique on the palm side to make "convertible" to fingerless mittens. Use bright contrasting yarn to make the pockets. Knit a little motif on the pockets. Size: Average Medium Woman Gauge: 5 sts/in Allow 3 ozs main color Worsted Weight Yarn Small amount waste yarn Size 7 US needles Size 7 US dpns for knitting thumb in the round 3 coilless safety pins 2 yarn loop markers Optional: 1 lanyard clip for optional mitten stringer Pockets: Make 2 With main yarn and leaving 3" tail, cast on 14 sts Work 14 rows, or more if desired, in stockinette, finishing with a purl row. Break yarn, leaving 3" tail. Place on holder or length of waste yarn and set aside. Left Mitten (Right Mitten is the same except that pocket is placed on the other end of the work) Co on 17 provisionally with waste yarn, then begin pattern with main yarn, leaving a 10" tail Mark sts 5, 9, and 13 with coilless safety pins Row 1: k1, m1, * knit to marked st, m1, k1, m1. Repeat from * twice. Knit to last st, m1, k1. (25) Row 2 and all even rows: purl Row 3: Repeat row 1 (33) Row 5: Repeat row 1 (41) Rows 6 - 22: Work in stockinette Row 23: k4, pm, work 1/1 rib over next 12 sts, pm, k to end of row (41) Rows 24 & 25: Work in stockinette, keeping sts between markers in 1/1 rib Row 26: Purl to marker, remove marker, bind off next 12 sts in rib (remember to remove 2nd marker and bind off last ribbing st) Row 27: k3, sl 1. With right side facing, place pocket sts on left needle. Replace slipped st on left needle, then K2tog (mitten st and first pocket st), k12, k2tog (last pocket st and next mitten st) (41) Row 28: purl Thumb Gusset: Row 29: K19 and drop main yarn without breaking it. The next step is all done with waste yarn, ignoring mitten sts for now. With waste yarn, knit next 3 sts of mitten, turn. Purl, turn Incr in each st, turn (6) Purl, turn Incr in each st and cast on 1 st (13) Place these waste yarn sts on the left needle, cut waste yarn, and resuming with main yarn, knit 32 and turn (51) Row 30: purl. Mark center stitch with a coilless safety pin Row 31: knit to 2 sts before marked center, ssk, k1, k2tog, knit to end of row (49) Row 32 and all even rows: purl Row 33: Repeat row 31 (47) Row 35: Repeat row 31 (45) Row 37: Repeat row 31 (43) Row 39: Repeat row 31 (41) Row 40: Purl Row 41: Knit Row 42: Purl Row 43: Knit Row 44: Purl Decrease for wrist: Row 45: k2tog, * k3, k2tog, repeat from * across to last 4 sts, k2, k2tog (32) Row 46: * k2, p2, repeat from * across Rows 47 - 49: repeat row 46 Row 50: k2, p2, yo, k2tog, p2, * k2, p2, repeat from * across (buttonhole made for optional mitten stringer, omit if you like) Position on other end of this row for Right Hand Mitten. Row 51 -54: repeat row 46 Row 56: Bind off in ribbing. Cut yarn leaving 8" tail for sewing side seam. Thumb: Using dpns, pick up stitches around the waste yarn, keeping the original 3 mitten sts on their own needle for the moment. You should be able to get 16 or 17. Remove the waste yarn knit ting and you will have a gaping hole for the thumb. Join main yarn at the first of the 3 original mitten sts used for the waste yarn knit ting. K2, k2tog, knit to last st, knit this stitch together with first st of round. (14 or 15) Work stockinette rounds on these sts until thumb is about 1/4" less than desired length. Decrease Round: k1, k2tog around. Last Decrease Round: k2tog around. Cut yarn and draw through remaining sts. Use Kitchener Stitch to weave top of mitten after removing waste yarn Sew side seam using a nice neat mattress stitch. Turn mittens inside out and sew pocket sides and bottom, using yarn tails and "skimming" the mitten stitches. (These sts shouldn't show on the outside) You may want to use your safety pins to position the pocket from the right side before sewing so as not to skew the opening. Optional Mitten Stringer: Leaving 3" tail, chain 2" length of main yarn, finish off and leave 3" tail. Using a yarn tail, firmly attach lanyard clip to one end of the chain, passing repeatedly through the clip and the last chain st. Weave the remainder of this tail down through the chain for strength. Using the other yarn tail, sew the lanyard chain firmly inside one of the mittens , next to the stringer hole made in Row 50. Pass this tail repeatedly through the end of the chain and the inside of the mitten. Tie the tails together and hide the ends. Strength is the key here! To use: Pass the lanyard tail out through its hole, then pass it in through the hole of the other mitten and out the top. Now firmly attached to each other, use the clip to attach the mittens to a zipper pull, backpack loop, etc. Keep the lanyard inside the mitten so it won't hook on things. |
Back to Knitting and Crochet Projects at AllCrafts.net
|
Search AllCrafts.net |

Freebies
Download Free Fonts!
Subscribe to our newsletter
Thanksgiving Crafts | Christmas Crafts | Valentine's Day | Mother's Day Crafts | Father's Day Crafts | Earth Day Crafts | Easter Crafts | April Fool's Day | Back To School Crafts | Halloween Crafts | Holiday Crafts
Angel Crafts | Baby Crafts | Basketry | Beading | Candle & Soap Making | Computer Crafts | Crochet | Knitting | Doll-Making | Drawing & Painting | Family Tree | Felt Food | Felt Flower | Floral | Gardening Crafts | Greeting Cards | Jewelry & Beading | Kids Crafts | Preschool Printables | Locker Hooking | Nail Art | Nature Crafts | Needlework | Owl Crafts | Painting | Paint Chips | Patriotic Crafts | Pennants & Buntings | Plastic Canvas | Quilting | Rubber Stamps | Scrapbooking | Sewing | Shoe Crafts | Silhouette | Soap Making | Tatting | Wedding Crafts | Woodworking
Home | Sitemap | Email | Newsletter | Advertise
...