Free craft projects
The best FREE patterns so WONDERFUL people like YOU can create and SHARE!
Please let us know about any broken links that you find. THANKS

AllCrafts Home Page


Subscribe to

AllCrafts Updates

We respect your email privacy


In This Section


Free Quilting Patterns Links

Quilting Book Reviews

Quilting Magazines

Recommended Quilting Sites


AllCrafts
Crafts Sections

7" Safety Pin Beaded Christmas Tree


Free Christmas Craft Project from AllCrafts.net
See more Christmas Crafts Here


  • 102 ea #2 Safety Pins
  • 246 ea 12mm Starflake
  • 180 ea 6mm Faceted - Green
  • 108 ea 10mm Starflake
  • 90 ea 4mm Faceted - Green
  • 22 ea 6mm Faceted - Yellow
  • 22 ea 6mm Faceted - Blue
  • 22 ea 6mm Faceted - Red
  • 1 pc Star Pegged Ornament
  • 2 yd 20g Wire

Tools Needed: Wire Cutters, Glue


Instructions

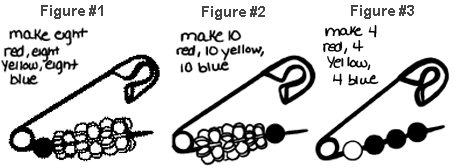
  1. Slip one colored 6mm bead, two 10mm starflakes and four 12mm starflakes onto a pin. Make 24 pins: eight red, eight yellow, and eight blue (fig.#1). Close each pin as you go through this step and each of the following steps.

  2. Slip four 12mm starflakes, two 10mm starflakes and one colored 6mm bead onto the pin. Make 30 pins: ten red, ten yellow, and ten blue (fig.#2).

  3. Slip one colored 6mm bead and three 6mm green beads onto the pin. Make 12 pins: four red, four yellow, and four blue (fig.#3).

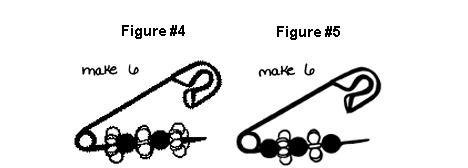
  4. Slip all green beads onto the pins in this order: one 12mm starflake, one 6mm round, one 12mm starflake, one 6mm round, and one 12mm starflake. Make 6 sets alike (fig.#4).

  5. Slip all green beads onto the pins in this order: one 6mm round, one starflake, one round, one starflake, one round. Make six sets alike (fig.#5).

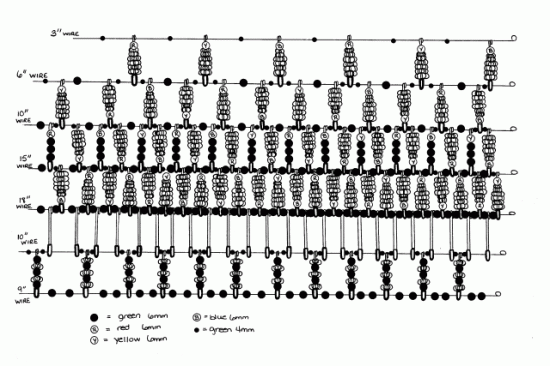
  6. Reserve 24 closed pins. These will be used on the bottom of the tree (see diagram between the 18" wire and the 10" wire, the last row is the base of the tree).


To Assemble The Tree:
(start at the top and work down)

  1. Cut the wire in the following lengths: one 3" piece, one 6" piece, two 10" pieces, one 15" piece, one 18" piece and one 9" piece. Make a loop at one end of each wire this will keep the beads and pins from falling off.

  2. Slip the pins and beads on the wire following the diagram.

  3. After each row is added, join in a circle by twisting the ends of the wire together very tightly. Trim off the ends about 1/4" from beads. Bend twist in toward the center .The diagram is shown with all rows as if they were flat. Remember to always join in a circle after each row.
    When the tree is completed insert ordinary mini tree lights into the cavity of the tree. A strand of ten to twenty five lights works best.


Illustrations


Click for larger image
Click image above for larger view.


Figures 4-6


Figures 4-6


Free Christmas Craft Project from AllCrafts.net
See more Christmas Crafts Here


Free Weekly Christmas Crafts Emails from AllCrafts
Email:

Get in the Christmas spirit with our weekly dose of free Christmas craft projects! Emails will begin after Thanksgiving and end right before Christmas. You can unsubscribe anytime, but we'd love to have you along for the Christmas fun!

Search AllCrafts.net
ac store

Link to AllCrafts
We love sites with free crafts!


Crafts Books at Amazon


Freebies

Download Free Fonts!
Subscribe to our newsletter


AllCrafts.net Free Crafts Network
Advertise here  Copyright © 1999-2017 by Wendy Litten Disclaimer
Sitemap  Last updated: